分布式存储FastDFS
介绍
FastDFS 是一个开源的高性能分布式文件系统(DFS),实现了文件存储,文件同步和文件访问,以及高容量和负载平衡等功能。
FastDFS 系统有三个角色:跟踪服务器(Tracker Server)、存储服务器(Storage Server)和客户端(Client)。
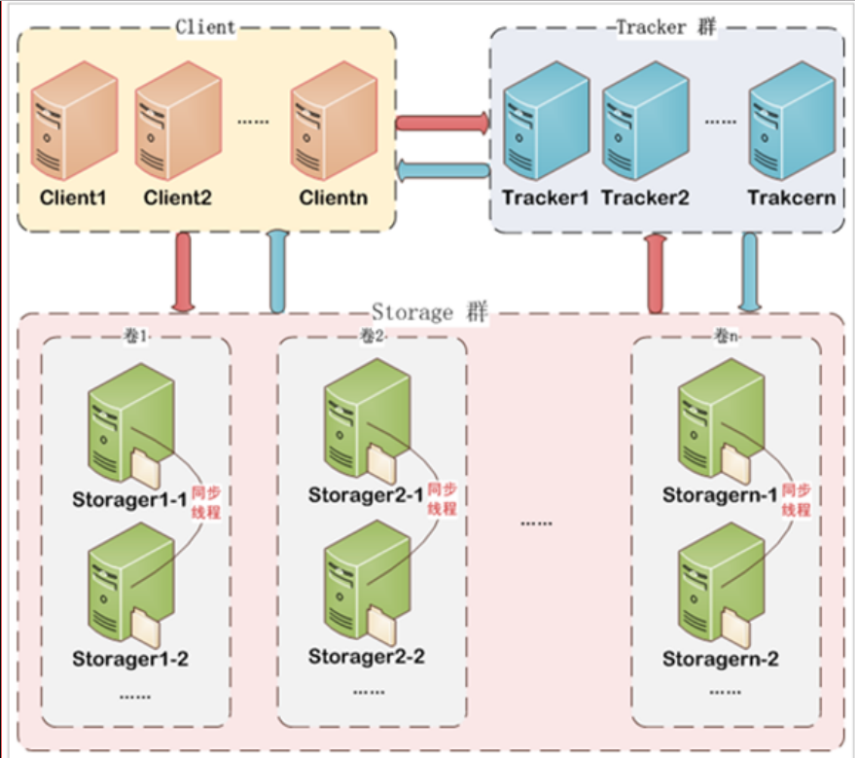
Tracker Server
- 跟踪服务器,主要做调度工作,起到均衡的作用;
- 负责管理所有的
storage server和group,每个storage在启动后会连接Tracker,告知自己所属group等信息,并保持周期性心跳。 - 多个
Tracker之间是构成集群,会自动选主,不存在单点故障。
Storage Server
- 存储服务器,主要提供容量和备份服务;
- 以
group为单位,每个group内可以有多台storage server,组内的storage server上的数据互为备份。
Client
客户端,上传下载数据的服务器
适用场景
- 非常适合用来存储用户图片、视频、文档等文件。对于互联网应用,和其他分布式文件系统相比,优势非常明显。
出于简洁考虑,FastDFS没有对文件做分块存储,因此不太适合分布式计算场景。不太适合大文件的存储。
集群搭建准备
系统软件说明
- centos7.x linux操作系统,用yum install来安装软件包
- libfastcommon-master fastdfs依赖的公共库
- fastdfs-5.11 fastdfs包
- nginx-1.12 nginx
- nginx-fastdfs-module-1.20 nginx的fastdfs模块
应用资源安装表
本文使用docker来安装部署fdfs集群的实践。

| 服务器 | 运行进程 | 服务器ip | 端口 | 备注 |
|---|---|---|---|---|
| tracker1 | trackerd | 172.17.0.3 | 22122 | |
| tracker2 | trackerd | 172.17.0.4 | 22122 | |
| storage1 | storagednginx + fastdfs-module | 172.17.0.5 | 2300080 | |
| storage2 | storagednginx + fastdfs-module | 172.17.0.6 | 2300080 | |
| client | 172.17.0.7 | 用来测试上传的 |
安装过程
| |
安装libfastcommon库[必须]
1.下载最新的包
wget https://github.com/happyfish100/libfastcommon/archive/master.zip
2.解压
unzip master.zip
3.进入目录并编译
| |
4.安装
./make.sh install
5.设置几个软链接、方便后续扩展nginx时使用
| |
- 如果
make: cc: Command not found,说明没有gcc,安装执行yum install -y gcc
安装fastdfs[必须]
1.下载fastdfs-5.11.zip
wget https://github.com/happyfish100/fastdfs/archive/V5.11.zip
2.解压
unzip V5.11.zip
3.进入目录并编译
| |
4.安装
| |
5.查看是否安装成功及版本
| |
- 如果
./make.sh: line 178: perl: command not found,请执行yum install -y perl- 如果
collect2: error: ld returned 1 exit status,请尝试先删除目录,重新解包得到新的未编译的目录。
安装nginx + fastdfs-module[可选]
1.下载需要的包
wget http://nginx.org/download/nginx-1.12.2.tar.gz
wget https://github.com/happyfish100/fastdfs-nginx-module/archive/V1.20.zip
2.解压
unzip V1.20.zip
tar -zxvf nginx-1.12.2.tar.gz
3.进入nginx目录预编译nginx
./configure --add-module=/opt/fastdfs-nginx-module-1.20/src
4.编译nginx
make
5.安装nginx
make install
6.验证nginx安装成功
[root@42766f00d9d3 nginx-1.12.2]# ls /usr/local/nginx/
conf  html  logs  sbin
- nginx版本1.12.2,fastdfs-nginx模块版本是1.20,切忌版本对应,不然可能会在安装过程中出错。
- 如果
./configure: error: the HTTP rewrite module requires the PCRE library.,请执行yum install -y pcre-devel安装。- 如果
./configure: error: the HTTP gzip module requires the zlib library.,请执行yum install -y zlib-devel安装。- 如果make出现如下异常
/usr/include/fastdfs/fdfs_define.h:15:27: fatal error: common_define.h: No such file or directory
                        #include "common_define.h
则需要修改如下
vi fastdfs-nginx-module-1.20/src/config文件,
ngx_module_incs="/usr/include/fastdfs /usr/include/fastcommon/"
CORE_INCS="$CORE_INCS /usr/include/fastdfs /usr/include/fastcommon/"
然后重新
./configure和make
部署过程
/data/fastdfs为数据目录
部署tracker1
1.先创建数据目录
mkdir -p /data/fastdfs
2.复制得到配置文件/etc/fdfs/tracker.conf
cp /etc/fdfs/tracker.conf.sample /etc/fdfs/tracker.conf
3.修改配置文件tracker.conf
base_path=/data/fastdfs
主要修改保存数据路径,其他暂时不变。 4.启动trackerd
fdfs_trackerd /etc/fdfs/tracker.conf
5.查看是否启动成功
[root@63a682eec736 fdfs]# ps -ef | grep fdfs
root        23     1  0 08:13 ?        00:00:00 fdfs_trackerd /etc/fdfs/tracker.conf
root        32     1  0 08:15 pts/0    00:00:00 grep --color=auto fdfs
6.查看tracker日志
[root@63a682eec736 fdfs]# tail -1000f /data/fastdfs/logs/trackerd.log
[2020-04-30 08:13:29] INFO - FastDFS v5.11, base_path=/data/fastdfs, run_by_group=, run_by_user=, connect_timeout=30s, network_timeout=60s, port=22122, bind_addr=, max_connections=256, accept_threads=1, work_threads=4, min_buff_size=8192, max_buff_size=131072, store_lookup=2, store_group=, store_server=0, store_path=0, reserved_storage_space=10.00%, download_server=0, allow_ip_count=-1, sync_log_buff_interval=10s, check_active_interval=120s, thread_stack_size=64 KB, storage_ip_changed_auto_adjust=1, storage_sync_file_max_delay=86400s, storage_sync_file_max_time=300s, use_trunk_file=0, slot_min_size=256, slot_max_size=16 MB, trunk_file_size=64 MB, trunk_create_file_advance=0, trunk_create_file_time_base=02:00, trunk_create_file_interval=86400, trunk_create_file_space_threshold=20 GB, trunk_init_check_occupying=0, trunk_init_reload_from_binlog=0, trunk_compress_binlog_min_interval=0, use_storage_id=0, id_type_in_filename=ip, storage_id_count=0, rotate_error_log=0, error_log_rotate_time=00:00, rotate_error_log_size=0, log_file_keep_days=0, store_slave_file_use_link=0, use_connection_pool=0, g_connection_pool_max_idle_time=3600s
部署tracker2
请参考 ** 部署tracker1 ** 步骤操作即可
部署stroage1 + nginx
1.先创建数据目录
mkdir -p /data/fastdfs
2.复制得到配置文件/etc/fdfs/storage.conf
cp /etc/fdfs/storage.conf.sample /etc/fdfs/storage.conf
3.修改配置文件storage.conf
base_path=/data/fastdfs
store_path_count=1
store_path0=/data/fastdfs
tracker_server=172.17.0.3:22122
tracker_server=172.17.0.4:22122
主要修改保存数据路径,其他暂时不变。 4.启动storaged
fdfs_storaged /etc/fdfs/storage.conf
5.查看是否启动成功
[root@843192fab33c fdfs]# ps -ef | grep fdfs
root        23     1  6 08:23 ?        00:00:08 fdfs_storaged /etc/fdfs/storage.conf
root        35     1  0 08:25 pts/0    00:00:00 grep --color=auto fdfs
6.查看storaged日志
[root@63a682eec736 fdfs]# tail -1000f /data/fastdfs/logs/storaged.log
...
[2020-04-30 08:23:44] INFO - file: tracker_client_thread.c, line: 310, successfully connect to tracker server 172.17.0.3:22122, as a tracker client, my ip is 172.17.0.5
[2020-04-30 08:23:44] INFO - file: tracker_client_thread.c, line: 1947, tracker server: #0. 172.17.0.3:22122, my_report_status: -1
[2020-04-30 08:24:14] INFO - file: tracker_client_thread.c, line: 1263, tracker server 172.17.0.3:22122, set tracker leader:172.17.0.3:22122
store_path_count=1需要和store_path*个数对应起来。- 查看storaged.log日志,最后显示连上了tracker则说明启动成功。
7.修改nginx配置
vi /usr/local/nginx/conf/nginx.conf
#在server节点下新增代理配置
location ~/group[0-9]/ {
    root /data/fastdfs;
    ngx_fastdfs_module;
}
8.去解压后的fastdfs目录下,将http.conf和mime.types拷贝到/etc/fdfs目录下
[root@843192fab33c conf]# ls
anti-steal.jpg  client.conf  http.conf  mime.types  storage.conf  storage_ids.conf  tracker.conf
[root@843192fab33c conf]# pwd
/opt/fastdfs-5.11/conf
[root@843192fab33c conf]# cp http.conf /etc/fdfs/
[root@843192fab33c conf]# cp mime.types /etc/fdfs/
9.把fastdfs-nginx-module安装目录中src目录下的mod_fastdfs.conf也拷贝到/etc/fdfs目录下
[root@843192fab33c src]# ls
common.c  common.h  config  mod_fastdfs.conf  ngx_http_fastdfs_module.c
[root@843192fab33c src]# pwd
/opt/fastdfs-nginx-module-1.20/src
[root@843192fab33c src]# cp mod_fastdfs.conf /etc/fdfs/
10.修改mod_fastdfs.conf配置
base_path=/data/fastdfs
tracker_server=172.17.0.3:22122
tracker_server=172.17.0.4:22122
url_have_group_name = true
group_name=group1
store_path0=/data/fastdfs

group_count = 1
[group1]
group_name=group1
storage_server_port=23000
store_path_count=1
store_path0=/data/fastdfs
11.创建M00至storage存储目录的符号连接
ln -s /data/fastdfs/data/ /data/fastdfs/data/M00
12.启动nginx
[root@843192fab33c fdfs]# /usr/local/nginx/sbin/nginx
ngx_http_fastdfs_set pid=54
#有master和worker进程则说明nginx启动成功
[root@843192fab33c fdfs]# ps -ef | grep nginx
root        55     1  0 09:04 ?        00:00:00 nginx: master process /usr/local/nginx/sbin/nginx
nobody      56    55  0 09:04 ?        00:00:00 nginx: worker process
root        58     1  0 09:04 pts/0    00:00:00 grep --color=auto nginx

部署stroage2 + nginx
请参考 [部署stroage1+nginx](#_部署stroage1 + nginx) 步骤操作即可
使用client测试
1.复制得到配置文件/etc/fdfs/client.conf
cp client.conf.sample client.conf
2.修改配置
base_path=/data/fastdfs
tracker_server=172.17.0.3:22122
tracker_server=172.17.0.4:22122
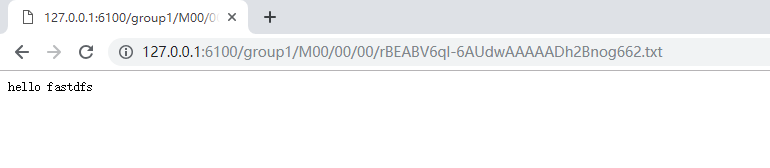
3.测试上传
[root@e22a928752b0 fdfs]# echo 'hello fastdfs' > test.txt
[root@e22a928752b0 fdfs]# fdfs_upload_file /etc/fdfs/client.conf test.txt
[2020-04-30 09:18:13] ERROR - file: ../client/client_func.c, line: 257, "/data/fastdfs" can't be accessed, error info: No such file or directory
[root@e22a928752b0 fdfs]# mkdir -p /data/fastdfs
[root@e22a928752b0 fdfs]# fdfs_upload_file /etc/fdfs/client.conf test.txt
group1/M00/00/00/rBEABV6ql-6AUdwAAAAADh2Bnog662.txt
4.测试nginx访问下载